After I seeing what my cookies could be I haven't been able to turn back. I sit and wait to find out what magical creations they have come up for their blogs and I am amazed each and every time. Now that it's my serious cookie season, serious as in I bake a lot...not serious as in snobby cookies, I want to try something new this year. I've decided that royal icing decorated cookies are the way to go.
It seems "easy" enough to get started. Make sugar cookies and royal icing, edge, flood and dry. It really was that easy! I picked a project that would help hide my cookies if they came out not so great, but they were perfect! I'm so excited. Now I have to confidence to tackle some more involved cookies like these and these.
Here is my cookie Christmas tree. I bought this cookie cutter set from Avon a couple months ago and it's about time I bust them out. Unfortunately (not really sure why) this particular cookie cutter set is not available from Avon any more. Hmmm. That's ok, Crate&Barrel swoops in to save the day with these cookie cutters. (You could also make this tree with any number of graduated star cookie cutters, simply make two to three cookies of each size.)
Equipment:
Cookie cutters
10 star cookies (from a half recipe of No Fail Sugar Cookies)
Full recipe of Royal Icing
1 piping bag with coupler
#3 piping tip
1 squeeze bottle (I used a thoroughly washed salad dressing bottle)
Toothpicks
Sprinkles
{if you bake and don't have a sil-pat yet, please please please get one. you will thank yourself later.}
Stop. Right now stop. Before you make your icing go read Bake at 350's Royal Icing 102 post. It will tell you pretty much everything you need to feel ready to use royal icing if you're a beginner {like me} and Bridget has lots of great pictures and answers to FAQs to help you get things right the first time.
Okay, so, you've baked your cookies and let them cool completely. You royal icing has super stiff peaks, you've bagged your piping icing, thinned your flood icing, and put your flood icing into the squeeze bottle. Let's decorate some cookies!
Outline your cookies with your piping icing.
Practice makes perfect. I'm counting on my piping getting better with time.
Once your cookies are outlined, allow them to dry for 15 to 20 minutes.
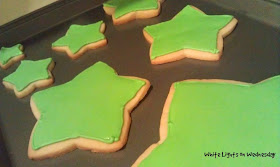
Now, take your cookie and add some flood icing.
Don't worry if you didn't squeeze quite enough icing the first time.
You can always add a little bit more if you need to.
Using a toothpick, drag the icing out to the piped edges
and around the middle to help the flood icing fill in your cookie.
I was worried I would run out of piping and flood icing so I started decorating (during both stages) with the smallest cookies first. That way if I ran out if icing I could still build a normal looking tree. But, I had plenty of both icings. So don't worry if you're using 10 cookies.
Allow the filled cookies it sit out overnight to dry completely.
Store you piping icing (in its pastry bag) in a Tupperware container placed in the refrigerator. The icing will stay soft.
I may or may not have checked my flood icing before going to bed.
Do NOT do this.
I got lucky. I will be covering the center of the cookie with another cookie.
Good Morning!
It's time to finish our cookies, yay!
Grab your piping icing from the fridge. Place the biggest star on your plate.
Pipe little green dots on the corners of the star. Add a sprinkle to each dot.
Pipe some icing in the middle of the star. This will be the glue that holds the star layers together as you build the tree.
Add the next biggest star on top and turn it
so that the points are opposite the previous star.
Pipe dots on the points, add sprinkles, and pipe your glue swirl.
Repeat until you reach the last star.
The littlest star will get one sprinkle in the middle.
Super cute!
This would be a great way to serve cookies at a party.
They take up hardly any room on the table.
If you "glue" your stars together the tree will be more stable but the bigger cookies will need to be broken to eat. Your call.


I love this!!! Why have I never done this with my kids??? Thanks so much for the idea and inspiration!
ReplyDeleteLove love love it! You did a fantastic job! Keep up the good work. The more you practice the easier it gets.
ReplyDeleteYou gave me a good idea....(insert lightbulb) I don't have that cutter set but I have a set that is snowflakes that have numerous sizes. I bet a tree could be made with snowflake cutters as well. Hmmmm I may have to try next week. We'll see.
Your cookie tree is beautiful, Jules. Nice job : )
ReplyDelete